Ranger 1.5 Epic Guide
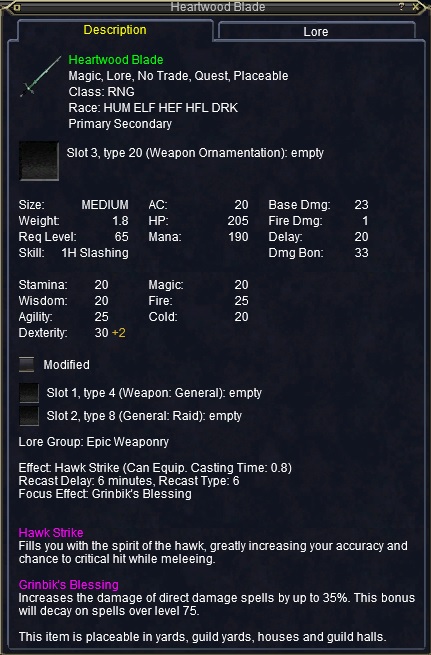
Heartwood Blade![]()
You must have completed either the Ranger 1.0 Epic or the Ranger 1.5 Pre-Quest to begin this quest.
Pre-farmable Steps (This is assuming OoW is unlocked):
Step 1 – Forage in Rathe Mountains for Sickly Maiden’s Hair
Step 4 – Level Fletching to 102
Step 5 – Collect all items in Step 5
Step 1
Go to Rathe Mountains. Forage until you get ![]() Sickly Maiden’s Hair.
Sickly Maiden’s Hair.
Step 2
Go to Eastern Karana and locate Althele (-3650, -1600). Say “out of balance” to receive emote:

Then give her ![]() Sickly Maiden’s Hair to receive
Sickly Maiden’s Hair to receive ![]() Tuft of Sickly Maiden’s Hair.
Tuft of Sickly Maiden’s Hair.

Step 3
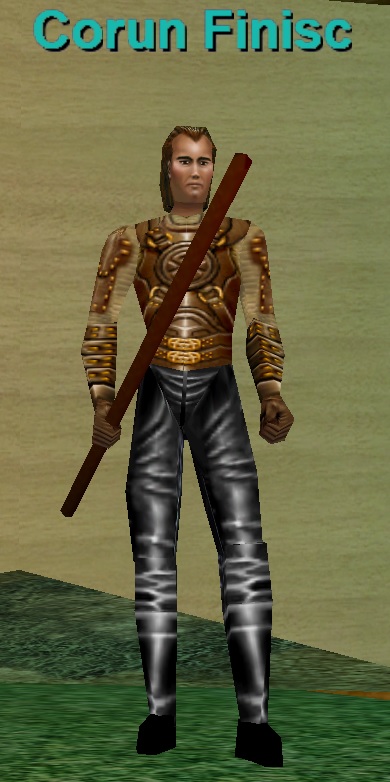
Go to Surefall Glade and locate Corun Finisc. He roams a bit. Give him ![]() Tuft of Sickly Maiden’s Hair to receive
Tuft of Sickly Maiden’s Hair to receive ![]() Borrowed Medicine Bag (6-slot container) and
Borrowed Medicine Bag (6-slot container) and ![]() 6x Magical Sample Vial.
6x Magical Sample Vial.
Step 4
Get Fletching to 102: Fletching Guide
Step 5
Collect the following items. They will be used in Fletching combines:
1) ![]() 1x Fallen Tree Branch – Foraged – Dranik’s Scar/City of Dranik/Possibly other Omens of War Zones.
1x Fallen Tree Branch – Foraged – Dranik’s Scar/City of Dranik/Possibly other Omens of War Zones.
2) ![]() 1x Pine Sap – Foraged – Jaggedpine Forest/Abysmal Sea/Nedaria’s Landing
1x Pine Sap – Foraged – Jaggedpine Forest/Abysmal Sea/Nedaria’s Landing
3) ![]() 4x Phase Spider Silk – Drops – a phase spider in Dragon Necropolis
4x Phase Spider Silk – Drops – a phase spider in Dragon Necropolis
4) ![]() 1x Whittling Knife – Bought – Abysmal Sea from Tasec Dreeng (-80, +200) — Use Find.
1x Whittling Knife – Bought – Abysmal Sea from Tasec Dreeng (-80, +200) — Use Find.
5) ![]() 8x Golanda Nut (tradable) – Foraged – Most Omens of War zones
8x Golanda Nut (tradable) – Foraged – Most Omens of War zones
6) ![]() 1x Smithy Hammer – Bought – Borik Darkanvil, Southeast Trader Building, PoK | Loc: -375 +500
1x Smithy Hammer – Bought – Borik Darkanvil, Southeast Trader Building, PoK | Loc: -375 +500
Step 6
Combine the following into a Fletching Kit:
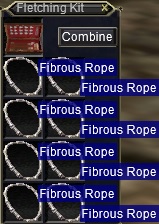
1) Combine ![]() 1x Golanda Nut and
1x Golanda Nut and ![]() 1x Smithy Hammer to create
1x Smithy Hammer to create ![]() Fibrous Rope. Do this until you have
Fibrous Rope. Do this until you have![]() 8x Fibrous Rope.
8x Fibrous Rope. ![]() Smithy Hammer will be returned upon each combine.
Smithy Hammer will be returned upon each combine.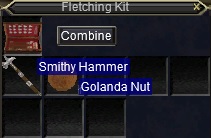
2) Combine ![]() 8x Fibrous Rope to create
8x Fibrous Rope to create ![]() Eight-loop Lasso.
Eight-loop Lasso.
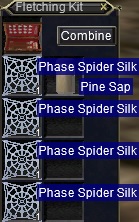
3) Combine ![]() 4x Phase Spider Silk with
4x Phase Spider Silk with ![]() 1x Pine Sap to create
1x Pine Sap to create ![]() Phase Netting.
Phase Netting.
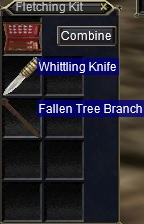
4) Combine ![]() 1x Fallen Tree Branch with
1x Fallen Tree Branch with ![]() 1x Whittling Knife to create
1x Whittling Knife to create ![]() Long Net Pole.
Long Net Pole.
5) Combine ![]() Long Net Pole with
Long Net Pole with ![]() Phase Netting to create
Phase Netting to create ![]() Large Butterfly Net.
Large Butterfly Net.

6) Verify the two resulting items you now have are: ![]() Large Butterfly Net and
Large Butterfly Net and ![]() Eight-loop Lasso.
Eight-loop Lasso.
Step 7
1) Go to Siren’s Grotto and locate a twitching swordfish. Equip ![]() Large Butterfly Net in your primary slot before engaging. If you don’t have it equipped you’ll an emote telling you to equip it.
Large Butterfly Net in your primary slot before engaging. If you don’t have it equipped you’ll an emote telling you to equip it.
Get a twitching swordfish below 20% HP. Make sure to NOT kill it. Use low level nukes and turn away from it so don’t riposte.
Once it’s below 20% you just have to be patient. Let the a twitching swordfish continue to hit you until you get ![]() Captured Swordfish on your cursor. If it regenerates back above 20% that is fine. You only need to get it below 20% once. If you kill it by mistake the respawn time is a bit over an hour.
Captured Swordfish on your cursor. If it regenerates back above 20% that is fine. You only need to get it below 20% once. If you kill it by mistake the respawn time is a bit over an hour.
**This can be buggy. Sometimes you will not get the item. I am not sure what the solution is. I have tried resetting the mob and it doesn’t seem to do anything. You may have to kill it and come back. It work for me when I killed it and came back***


2) Go to Temple of Cazic-Thule and locate a sickly mosquito. It is in back of the sewers. Repeat the same process as the Part 1 above. Equip ![]() Large Butterfly Net in your primary slot before engaging. This one worked on the first time for me. I got the
Large Butterfly Net in your primary slot before engaging. This one worked on the first time for me. I got the ![]() Captured Mosquito on my cursor about 30 seconds after getting the mob under 20% HP.
Captured Mosquito on my cursor about 30 seconds after getting the mob under 20% HP.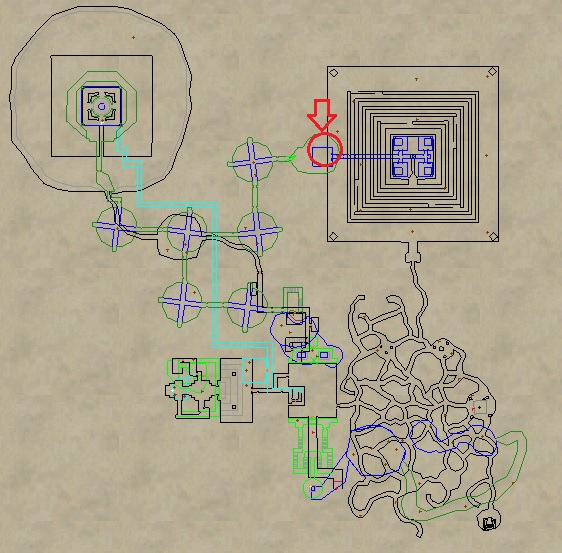

3) Go Temple of Droga and locate a bloated drogan spider. Repeat the same steps as Part 1. This time equip ![]() Eight-loop Lasso in your primary slot before engaging. It also spawns some adds that don’t hit for much. You’ll receive
Eight-loop Lasso in your primary slot before engaging. It also spawns some adds that don’t hit for much. You’ll receive ![]() Captured Spider from this one.
Captured Spider from this one.

4) Go to ChardokB (Halls of Betrayal) and locate a leprous chokidai. Repeating the same steps as Part 1. This time equip ![]() Eight-loop Lasso in your primary slot before engaging. You’ll receive
Eight-loop Lasso in your primary slot before engaging. You’ll receive ![]() Captured Chokidai.
Captured Chokidai.


Step 8
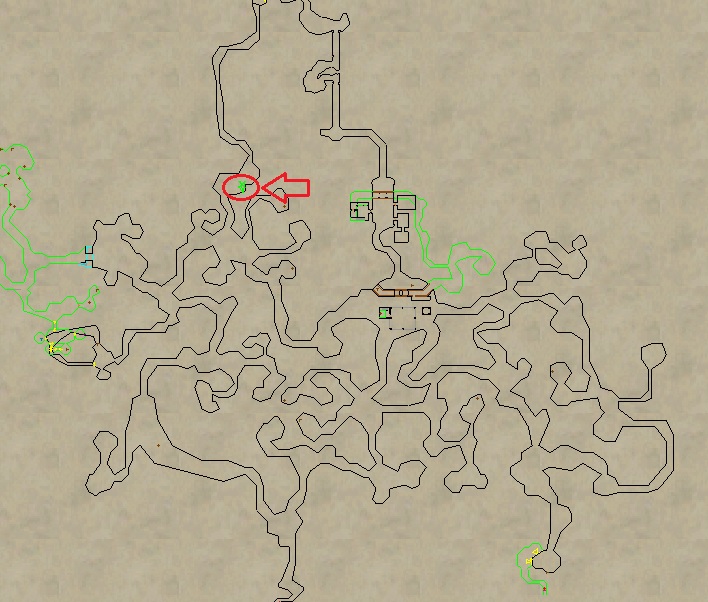
Go to Western Wastes with a small group and locate a neuralgic huntress. She roams in the middle area of the zone. Track her. Kill it and loot ![]() Neuralgic Wyvern Blood.
Neuralgic Wyvern Blood.

Step 9
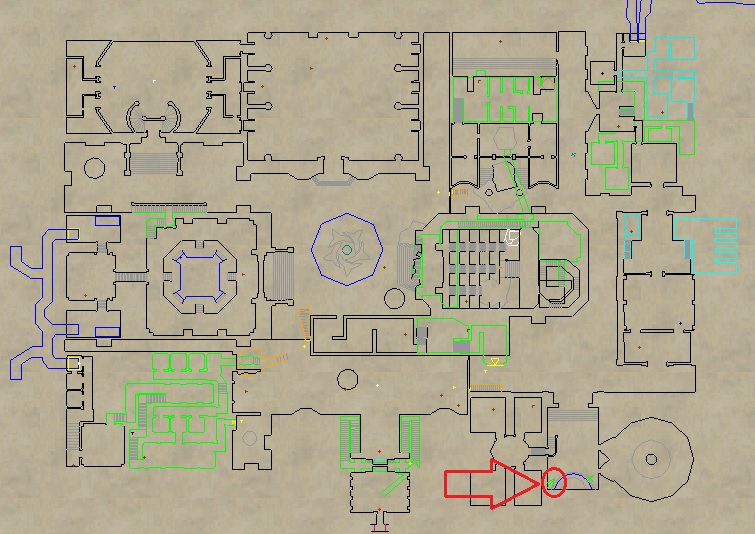
Go to Veksar with a small group and locate an asteatotic highborn. Kill it and loot ![]() Asteatotic Veksar Blood.
Asteatotic Veksar Blood.

Step 10
Combine the following in a Fletching Kit:
1) ![]() Captured Spider and
Captured Spider and ![]() Magical Sample Vial to create
Magical Sample Vial to create ![]() Bloated Drogan Spider Blood Sample.
Bloated Drogan Spider Blood Sample.
2) ![]() Captured Mosquito and
Captured Mosquito and ![]() Magical Sample Vial to create
Magical Sample Vial to create ![]() Sickly Mosquito Blood Sample.
Sickly Mosquito Blood Sample.
3) ![]() Captured Swordfish and
Captured Swordfish and ![]() Magical Sample Vial to create
Magical Sample Vial to create ![]() Twitching Swordfish Blood Sample.
Twitching Swordfish Blood Sample.
4) ![]() Captured Chokiadi and
Captured Chokiadi and ![]() Magical Sample Vial to create
Magical Sample Vial to create ![]() Leprous Chokidai Blood Sample.
Leprous Chokidai Blood Sample.
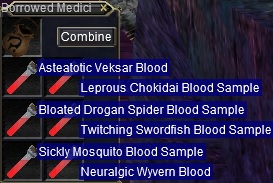
5) Combine the below in your ![]() Borrowed Medicine Bag (6-slot container) to create
Borrowed Medicine Bag (6-slot container) to create ![]() Full Medicine Bag.
Full Medicine Bag.
![]() Bloated Drogan Spider Blood Sample
Bloated Drogan Spider Blood Sample![]() Sickly Mosquito Blood Sample
Sickly Mosquito Blood Sample![]() Twitching Swordfish Blood Sample
Twitching Swordfish Blood Sample![]() Leprous Chokidai Blood Sample
Leprous Chokidai Blood Sample![]() Neuralgic Wyvern Blood
Neuralgic Wyvern Blood![]() Asteatotic Veksar Blood
Asteatotic Veksar Blood
Step 11
Go back to Surefall Glade and locate Corun Finisc. He roams a bit. Give him ![]() Full Medicine Bag to receive
Full Medicine Bag to receive ![]() Corun’s Notes.
Corun’s Notes.
Step 12
Go to West Freeport and locate Shana Liskia. She is on the second floor which requires you take the teleporter up. Give her ![]() Corun’s Notes to receive
Corun’s Notes to receive ![]() Corun’s Notes – Annotated.
Corun’s Notes – Annotated.


Step 13
Go to The Deep with a small group and locate an ancient thought horror. It will spawn when you get close to its location. Kill it and loot ![]() Thick Spinal Fluid.
Thick Spinal Fluid.

Step 14
Go back to West Freeport and locate Shana Liskia. She is on the second floor which requires you take the teleporter up. Give her ![]() Corun’s Notes – Annotated and
Corun’s Notes – Annotated and ![]() Thick Spinal Fluid to receive
Thick Spinal Fluid to receive ![]() Mind Crystal.
Mind Crystal.
Step 15
Go to Eastern Karana and locate Tholris (-3650, -1600). You’ll begin to see an emote. Keep saying “you are diseased” to Tholris. Eventually you’ll receive: ![]() Violet Crystal and
Violet Crystal and ![]() Red Crystal.
Red Crystal.


Step 16
Go back to West Freeport and locate Shana Liskia. Give her ![]() Violet Crystal and
Violet Crystal and ![]() Red Crystal to receive
Red Crystal to receive ![]() Letter to Corun.
Letter to Corun.
Step 17
Go back to Surefall Glade and locate Corun Finisc. He roams a bit. Give him ![]() Letter to Corun and
Letter to Corun and ![]() Mind Crystal to receive
Mind Crystal to receive ![]() Red Dogwood Seed.
Red Dogwood Seed.
Step 18
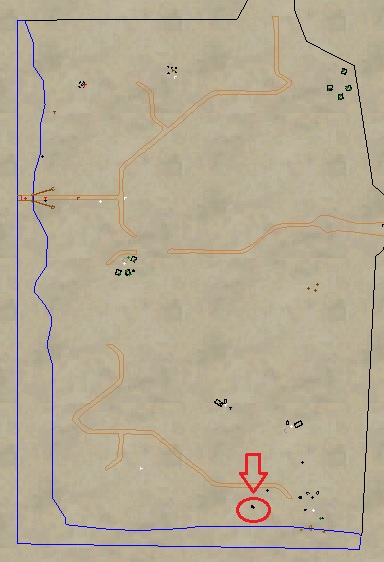
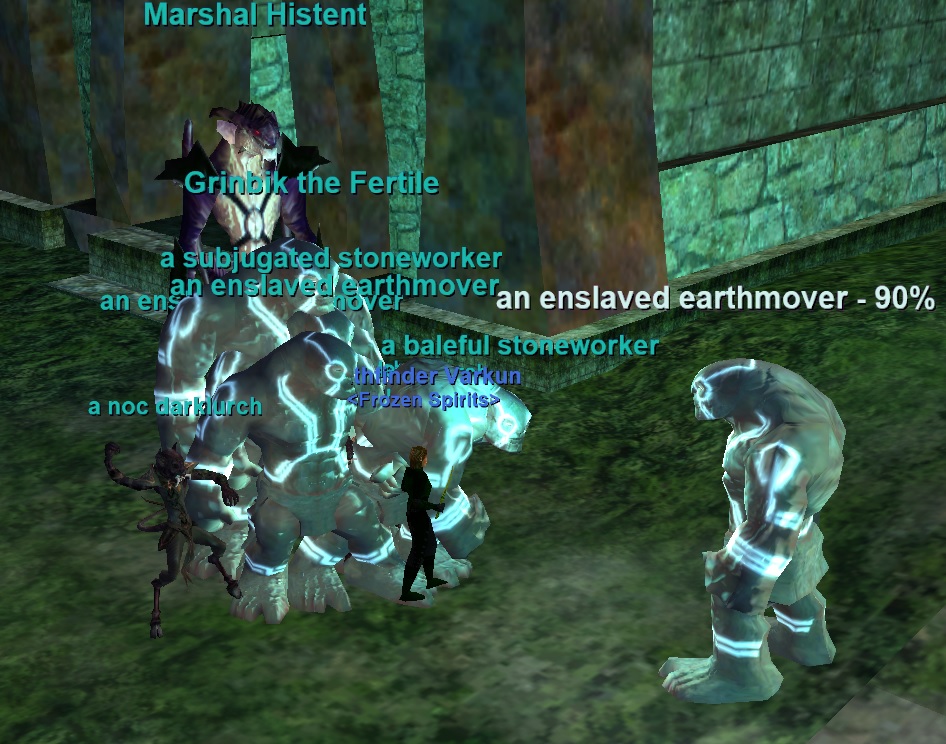
Go to The Bloodfields with medium sized raid and when you get close to the spot on the map (+400, +750) a raid event will spawn and attack when you (The Ranger) gets close.. There are a lot of adds here so its highly recommended to have your raid pre-clear the trash before you approach yourself.
Grinbik the Fertile and Marshal Histent both spawn along with golem adds. The golems can be crowd controlled. You’ll want to have a few tanks for this. Kill all the adds and Marshal Histent When Grinbik the Fertile gets low HP he will run back into the building and you’ll be able to interact with him. Hail him to receive ![]() Grinbik’s Blessing.
Grinbik’s Blessing.
Step 19
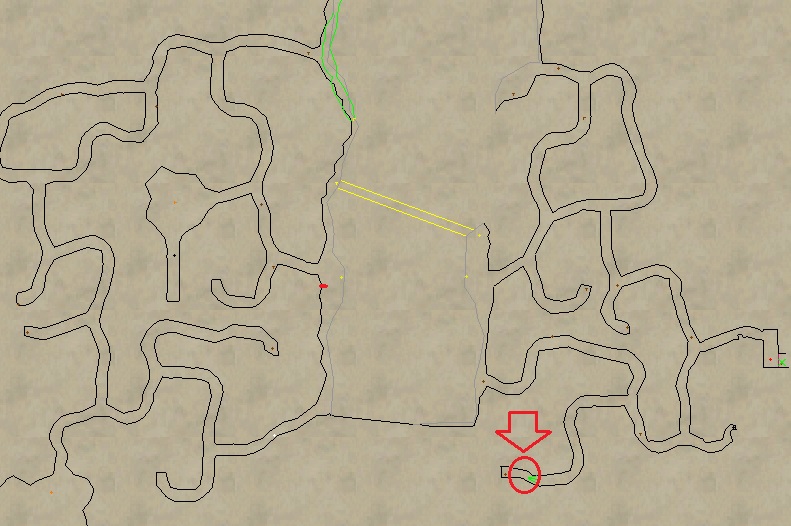
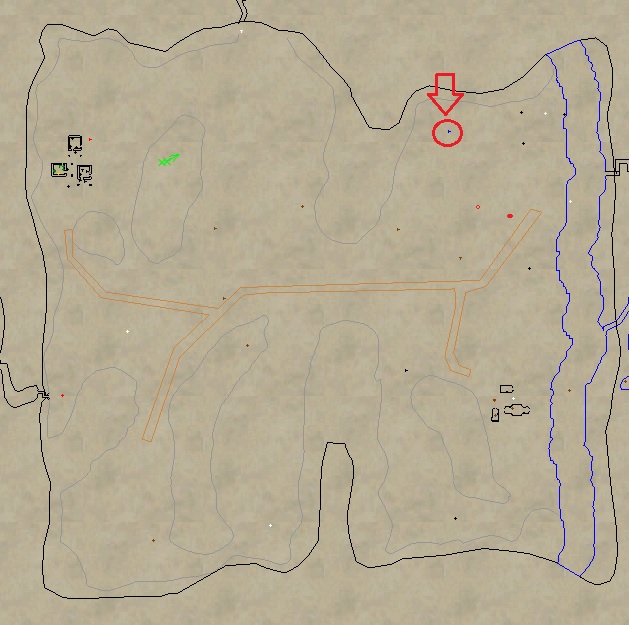
Take a raid to Natambi. head to the spot on the map. Raid mobs will spawn when you get close.
Kill 2x a bound spirit. Once those are dead kill Spiritbinder Trenzar.
– Hits for 1700+
– Casts Wave of Flame (NPC Hatelist, 1500 DD, Fire Based)
– Casts Mastruq Bellow (Single Target, .5 second stun, Prismatic Based)
A few more adds spawn during the fight. Kill Spiritbinder Trenzar. Kill adds as they spawn. Senvial of the Mist spawns during the fight also. Do NOT kill Senvial of the Mist. Get him low (around 8-10%) Once everything else is dead eventually he will stop attacking. Hail him to receive ![]() Senvial’s Blessing.
Senvial’s Blessing.


Step 20
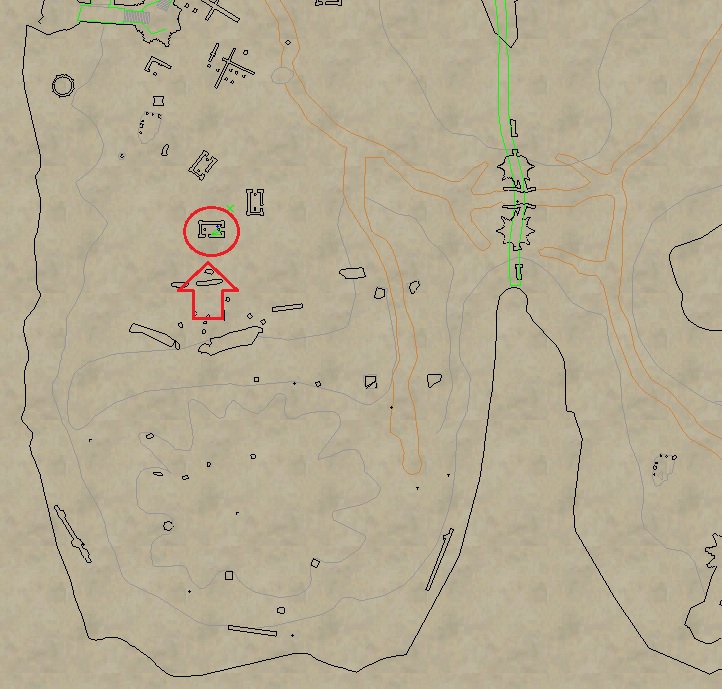
Go to Jaggedpine Forest. Get the ground spawn ![]() Fertile Earth (3-slot container) at +1390, -970.
Fertile Earth (3-slot container) at +1390, -970.
Step 21
While still in Jaggedpine, combine the following into ![]() Fertile Earth (3-slot container):
Fertile Earth (3-slot container):
![]() Red Dogwood Seed
Red Dogwood Seed![]() Grinbik’s Blessing
Grinbik’s Blessing![]() Senvial’s Blessing
Senvial’s Blessing

Red Dogwood Treant will spawn and begin to grow very large. Eventually you will receive ![]() Spring Dogwood Seed and
Spring Dogwood Seed and ![]() Red Dogwood Heart on your cursor.
Red Dogwood Heart on your cursor.

Step 22
Go back to Surefall Glade and locate locate Corun Finisc. He roams a bit. Give him ![]() Spring Dogwood Seed to receive
Spring Dogwood Seed to receive ![]() Block of Purest Silver.
Block of Purest Silver.
Step 23
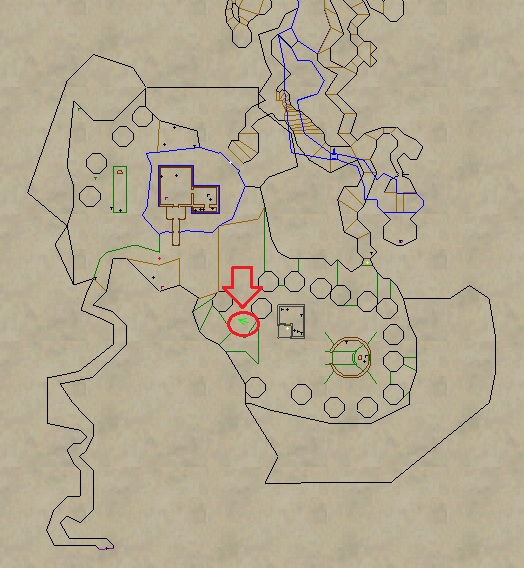
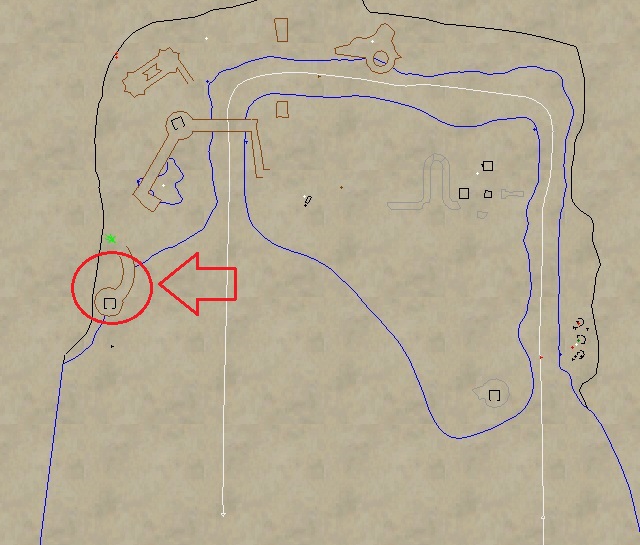
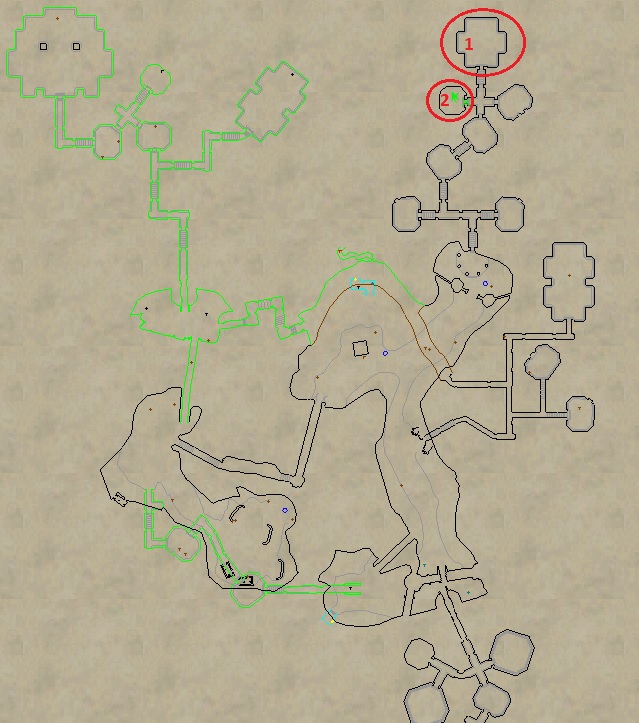
Go to The Runied City of Dranik with a raid. Get ready for a raid fight at Red Circle 1 on the map. The raid will spawn when you (The Ranger) gets close. There are a lot of adds your raid should pre-clear out of the room before you get close and spawn the event.
Once the room is clear get close and the raid event will start. You’ll see two groups of mobs and 2 boss mobs. Clear all the trash out. A lot of golems will spawn during this also. Kill everything and CC what you can.
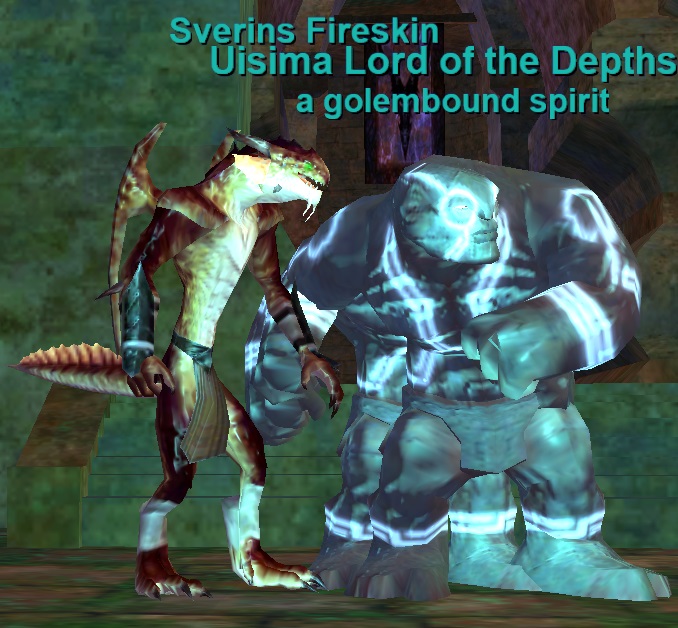
It seems at some point the 2 named will respawn in the Red Circle 2 room. Once all the trash is dead head to that room and you’ll find Sverins Fireskin and Uisima Lord of the Depths.
Kill Sverins Fireskin but no not kill Uisima Lord of the Depths. Get Uisima Lord of the Depths to low HP and eventually he will stop attacking. When he does give him ![]() Red Dogwood Heart to receive
Red Dogwood Heart to receive ![]() Wind-blessed Heartwood.
Wind-blessed Heartwood.
Step 24
Combine ![]() Wind-blessed Heartwood and
Wind-blessed Heartwood and ![]() Block of Purest Silver in a Flecthing Kit to receive your
Block of Purest Silver in a Flecthing Kit to receive your![]() 1.5 Epic: Heartwood Blade!
1.5 Epic: Heartwood Blade!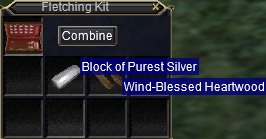


Thanks for using EQProgression!