Breakdown in Communication
Quest #9: Kod’Taz
Gates of Discord
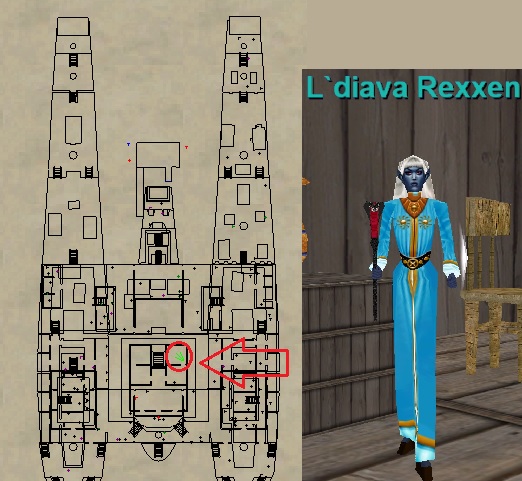
Step 1
Locate L`diava Rexxen in Abysmal Sea.
“Hail” her
Say “yes”
Say “frightful temple”
Step 2
Your ultimate goal is to get to the 3rd Ikkinz Group Trial: Temple of Tri-Fates. You will need to do the first two Trials in order to be able to request it. If you can already request 3rd Ikkinz Group Trial: Temple of Tri-Fates yourself then skip ahead to Step 7 (You cannot skip any progression, so if you can’t request it yourself then you must do all steps.). Otherwise, follow all steps.
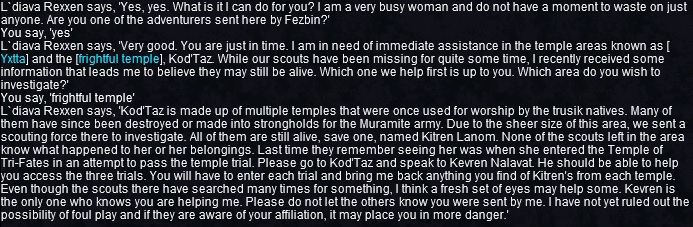
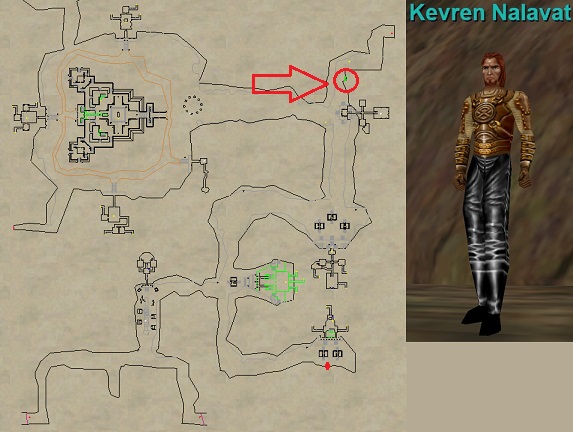
Go to Kod’Taz and locate Kevren Nalavat. Follow all his dialogue where he discusses the trials.
“Hail” him
Say “ready to be tested”
Say “trials”
Say “specific order”
Say “Singular Might”
See Dialogue >> HERE <<
Step 3
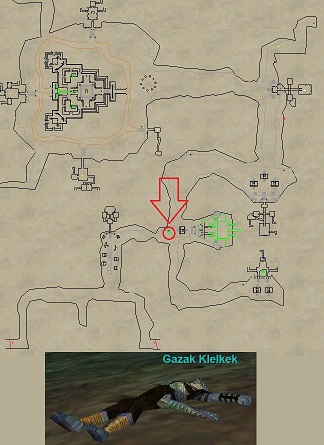
1) While in Kod’Taz locate Gazak Klelkek. This will be a group Trial. Follow his dialogue to request instance Ikkinz, Chambers of Singular Might. Follow your compass to zone in. It is inside the temple just next to Gazak Klelkek. Complete the trial and loot ![]() Ruined Pendant of Might from Cruel Illusion.
Ruined Pendant of Might from Cruel Illusion.
A Trial Guide can be found in the Kod’Taz Guides.
2) Go back out to Gazak Klelkek in Kod’Taz and give him ![]() Ruined Pendant of Might to receive emote:
Ruined Pendant of Might to receive emote:

Step 4
Go back to Kevren Nalavat in Kod’Taz.
“Hail” him
Say “ready to continue testing”
Say “trials”
Say “specific order”
Say “twin struggles”
See the dialogue >> HERE <<
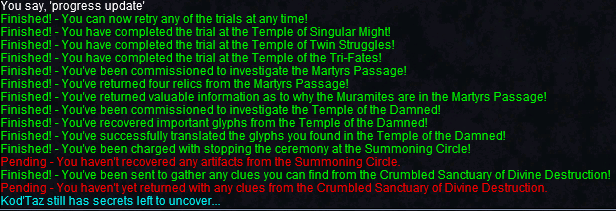
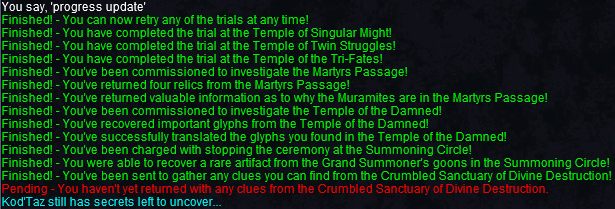
Note: You can say “progress update” to him to check your progress/flags.
At this point you should see: 
Step 5
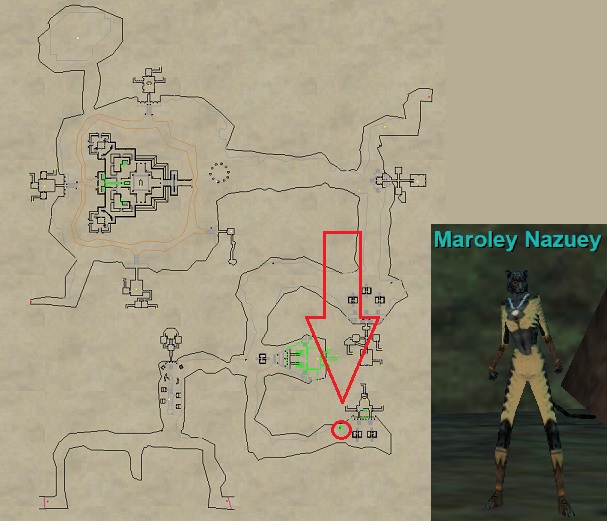
1) Locate Maroley Nazuey in Kod’Taz. This will be a group dungeon.
Follow her dialogue, Say “ready to enter the temple” to get the instance: Ikkinz #2, Chambers of Twin Struggles. A marker will appear on your compass that’ll lead you to the entrance.
A Trial Guide can be found in the Kod’Taz Guides.
2) Complete the Trial and loot ![]() Stained Stone Chalice from a pile of bones.
Stained Stone Chalice from a pile of bones.
3) Go back to Maroley Nazuey in Kod’Taz. Give her ![]() Stained Stone Chalice to receive emote:
Stained Stone Chalice to receive emote:

Step 6
Go back to Kevren Nalavat in Kod’Taz.
“Hail” him
Say “ready to continue testing”
Say “trials”
Say “specific order”
Say “tri-fates”
See the dialogue >> HERE <<
Note: You can say “progress update” to him to check your progress/flags.
At this point you should see:
Step 7
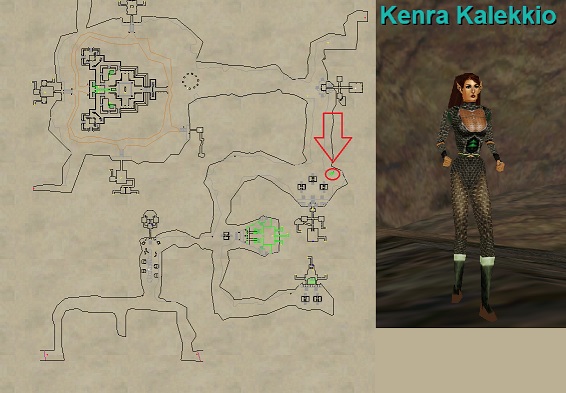
1) Go to Kod’Taz and locate Kenra Kalekko. This is a group dungeon. Follow her dialogue, say “ready to begin” to receive Ikkinz Trial #3: Chamber of the Tri-Fates. A marker will appear on your compass that’ll lead you to the entrance.
A Trial Guide can be found in the Kod’Taz Guides.
2) Complete the Trial. Loot TWO items. There are two a pile of bones to loot from.
– Loot ![]() Thrice-Notched Arrow Remains from a pile of bones. This item is used in regular progression if you need it.
Thrice-Notched Arrow Remains from a pile of bones. This item is used in regular progression if you need it.
– Loot ![]() Kitren’s Tattered Cloak from a pile of bones. This item is used in BiC #9 .
Kitren’s Tattered Cloak from a pile of bones. This item is used in BiC #9 .
3) Go back to Kenra Kalekko in Kod’Taz. Give her ![]() Thrice-Notched Arrow Remains to receive emote:
Thrice-Notched Arrow Remains to receive emote:

Step 8
Go back to L`diava Rexxen in Abysmal Sea. Give her ![]() Kitren’s Tattered Cloak to receive
Kitren’s Tattered Cloak to receive ![]() Sealed Note.
Sealed Note.
Step 9
1) Go back to Kevren Nalavat in Kod’Taz to receive emote:
2) Give him ![]() Sealed Note to receive emote:
Sealed Note to receive emote:

“Hail” him
Say “other tasks”
Say “martyrs passage”
Say “ancient relics”
Say “investigate”
Say “understand”
See the dialogue >> HERE <<
Note: You can say “progress update” to him to check your progress/flags.
At this point you should see: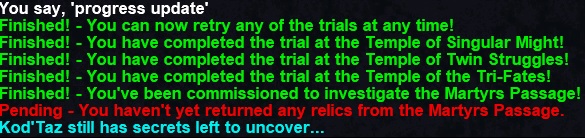
Step 10
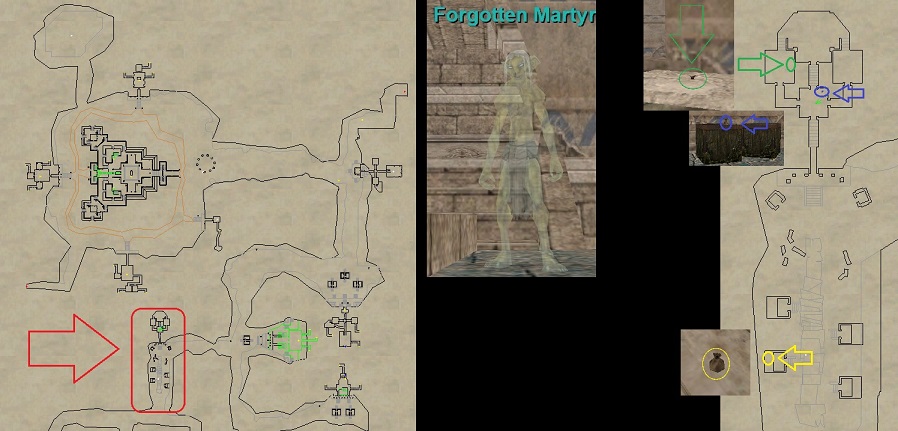
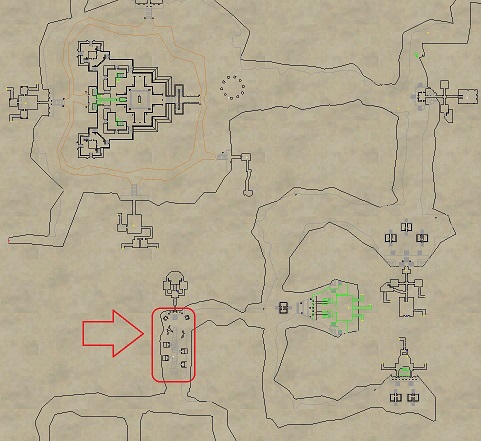
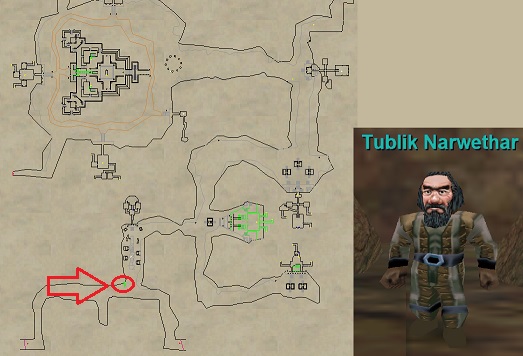
1) While still in Kod’Taz, head down to the Red Circle area of the zone (see map).
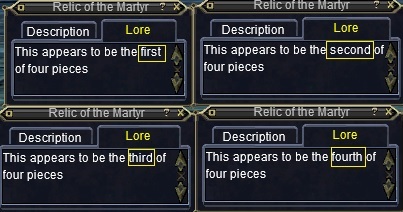
2) Kill “trusik” mobs in this area until you get ![]() 4x Relic of the Martyr. They are Lore items, but there are 4 different ones, each with different Item Lore. You’ll need one of each. It may take a few spawn cycles to get them all.
4x Relic of the Martyr. They are Lore items, but there are 4 different ones, each with different Item Lore. You’ll need one of each. It may take a few spawn cycles to get them all.
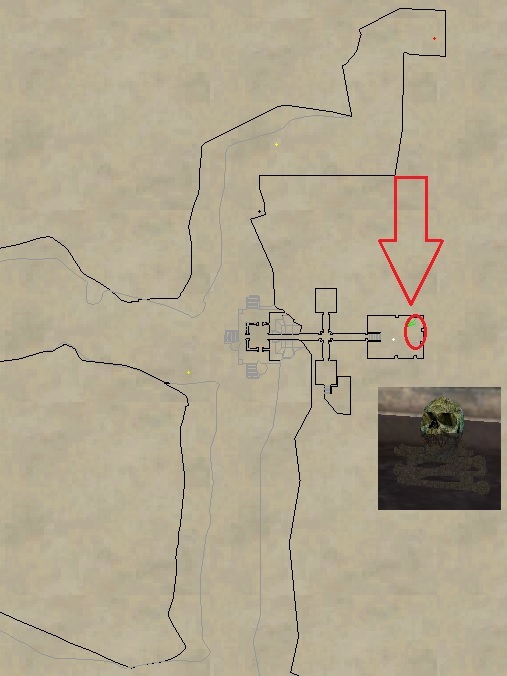
They mostly drop off of Forgotten Martyr, a rare named. More than 1 of these named can be up at a time. They can also occassionally drop off of “trusik” type mobs.
There are also a few places they can spawn on the ground, they look like bags (blue, green, and yellow circles on the right map).
3) You’ll also need to loot ![]() Inscribed Flesh Dispatch. This drops off mobs in the area including: trusik’s, Pixxt, and ikaav type mobs. I got mine off of an ikaav captor.
Inscribed Flesh Dispatch. This drops off mobs in the area including: trusik’s, Pixxt, and ikaav type mobs. I got mine off of an ikaav captor.
4) Also loot ![]() 4x Pile of Dust (ground spawns in the red area on the map, outside the temple. They look like bags and are pretty common. These will be used in Step 13.
4x Pile of Dust (ground spawns in the red area on the map, outside the temple. They look like bags and are pretty common. These will be used in Step 13.
Step 11
1) Once you have the ![]() 4x Relic of the Martyr and
4x Relic of the Martyr and ![]() 1x Inscribed Flesh Dispatch go back to Kevren Nalavat in Kod’Taz.
1x Inscribed Flesh Dispatch go back to Kevren Nalavat in Kod’Taz.
2) First, give him ![]() 4x Relic of the Martyr to him to receive emote:
4x Relic of the Martyr to him to receive emote:

3) Then give him ![]() 1x Inscribed Flesh Dispatch to receive another emote:
1x Inscribed Flesh Dispatch to receive another emote:

Progress update should now look like this:
Step 12
>
1) While at Kevren Nalavat in Kod’Taz, follow his dialogue:
“Hail” him
Say “problem”
Say “discover their plans”
Full Dialogue >> HERE<<
2) With a group, go a little south of Kevren Nalavat inside the temple. You’ll find a pile of bones on the ground in the far east room. Kill it to spawn a group event. Kill all mobs, loot ![]() 4x Glyph of the Damned (Loot 1x from each of the Guardian’s. They are LORE, but different items). There are 24 total, so if you have a 6 person group everyone can loot a set of 4.
4x Glyph of the Damned (Loot 1x from each of the Guardian’s. They are LORE, but different items). There are 24 total, so if you have a 6 person group everyone can loot a set of 4.
4x Pixxt Priest Guardians attack. They are slowable and mezzable. Kill them. Once they die Pixtt Priest Summoner becomes active. It is unslowable and hits 1800+ (35 Heroic Stamina). Kill it.

3) Go back to Kevren Nalavat in Kod’Taz. Give him ![]() 4x Glyph of the Damned. He will hand them back and you’ll receive an emote:
4x Glyph of the Damned. He will hand them back and you’ll receive an emote:

Step 13
1) If you didn’t get ![]() 4x Pile of Dust in Step 10, do so now. They are ground spawns in the area below. They look like bags and are pretty common.
4x Pile of Dust in Step 10, do so now. They are ground spawns in the area below. They look like bags and are pretty common.
2) Locate Tublik Narwethar in Kod’Taz. Mobs can aggro you here so be careful.
“Hail” him
Say “crumbled sanctuary”
Say “look for clues”
Say “stone tablet”
ay “glyph of the damned”
Full Dialogue >> HERE <<
– Give him ![]() 1x Glyph of the Damned. He will give it back and give you
1x Glyph of the Damned. He will give it back and give you ![]() Stone Tablet (8-slot container).
Stone Tablet (8-slot container).
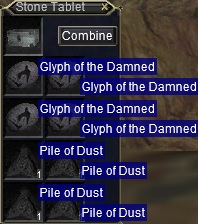
3) Combine the ![]() 4x Pile of Dust and
4x Pile of Dust and ![]() 4x Glyph of the Damned inside
4x Glyph of the Damned inside ![]() Stone Tablet (8-slot container) to create
Stone Tablet (8-slot container) to create ![]() Translated Glyph of the Damned.
Translated Glyph of the Damned.
Step 14
1) Go back to Kevren Nalavat in Kod’Taz. Give him ![]() Translated Glyph of the Damned. He will hand it back and emote. The
Translated Glyph of the Damned. He will hand it back and emote. The ![]() Glyph is no longer be needed after this at any point.
Glyph is no longer be needed after this at any point.

“Hail” him
Say “rumors”
Say “think you can do”
Say “final warning”
Full Dialogue >>HERE<<
Say “progress update” you should see this:
Step 15
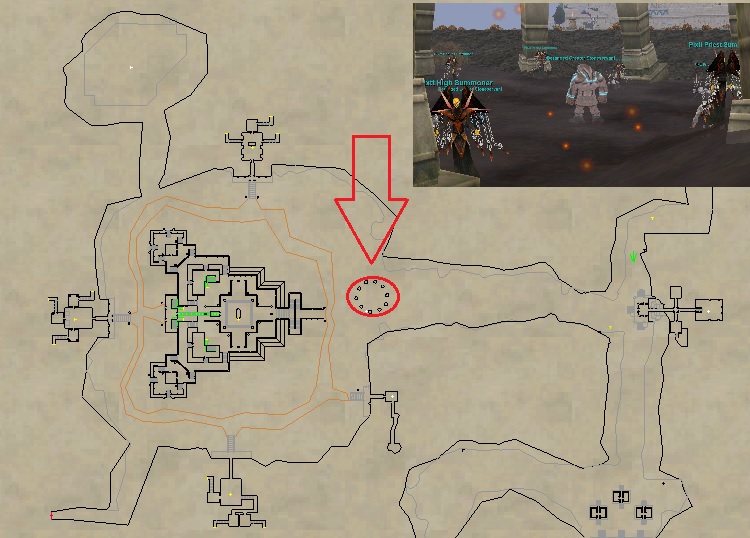
In Kod’Taz, head over to the Summoner Ring Event with a raid.
Raid Event Guide will be in the Raid section for GoD.
Complete it and loot a ![]() Grand Summoner’s Glyph from Deranged Supreme Stoneservant.
Grand Summoner’s Glyph from Deranged Supreme Stoneservant.
Step 16
1) Go back to Kevren Nalavat in Kod’Taz. Give him ![]() Grand Summoner’s Glyph to receive emote:
Grand Summoner’s Glyph to receive emote:

2) Say “i have done all you asked” to receive another emote and ![]() Sealed Confession:
Sealed Confession:

Note: At this point, you should see this for “progress update”:
For the purposes of BiC #9 this is as much as you need to do for Kod’Taz progression, but there are a few things left to do if you wish to do full progression. I won’t be going over those in this BiC guide, but it will be in the GoD progression guide.
Step 17
1) Go back to L`diava Rexxen in Abysmal Sea. Give her ![]() Sealed Confession to receive
Sealed Confession to receive ![]() Smoky Gem Shard.
Smoky Gem Shard.
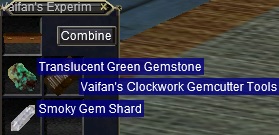
2) Combine the following in your ![]() Vaifan’s Experimental Sealer (4-slot container) to create
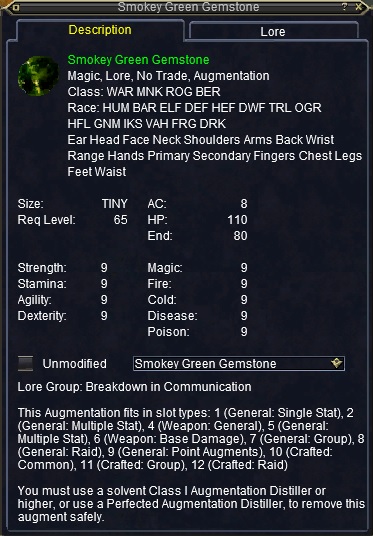
Vaifan’s Experimental Sealer (4-slot container) to create![]() Smokey Green Gemstone (or your class appropriate augment).
Smokey Green Gemstone (or your class appropriate augment).
![]() Smoky Gem Shard
Smoky Gem Shard![]() Translucent Green Gemstone (From BiC #8)
Translucent Green Gemstone (From BiC #8)![]() Vaifan’s Clockwork Gemcutter Tools
Vaifan’s Clockwork Gemcutter Tools
BiC Quest #9: Kod’Taz Complete!!

Thanks for using EQProgression!